


Postman is a comprehensive API testing tool that simplifies creating, testing, and documenting APIs, making it one of the easiest ways to get started with Anvil’s APIs. Postman offers an intuitive user interface that enables developers to easily design and test APIs, utilize pre-built collections, automate their testing processes, and collaborate amongst team members by allowing them to share and version control their API tests and collections.
API Testing with Postman
In this blog post we'll cover the installation process and provide an understanding of how to set up Postman for use with the Anvil API. So whether you're just getting started or have been working with Postman for a while, let's dive into everything you need to know about Postman and Anvil.
Step 1. Sign up for a Postman account
The first step is to create an account on Postman. You can create an account by downloading the latest version on your computer or using the website.
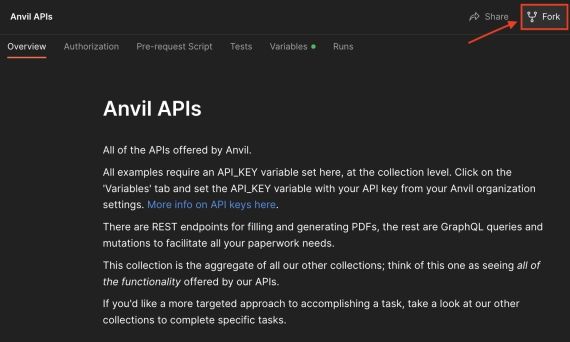
Step 2. Fork the Anvil collections
Once you have installed Postman, it is time to create your Anvil API collections. We have a public collection of APIs, which you can fork within Postman. This is the same kind of forking used in GitHub projects.
Instead of creating brand new collections, requests, and collection variables, forking allows you to have everything set up for you - the only thing you need to do is update the variables and authorization with your API key. Forking also lets you stay up to date with our collection as our API inevitably changes.
You can fork one of our collections by selecting the collection you wish to fork, and then choosing the fork option on the right side of your screen.
 Fork a collection by selecting the fork option
Alternatively, you can click the 3 dots to the right of the collection to open the menu, and choose the ‘Create a fork’ option.
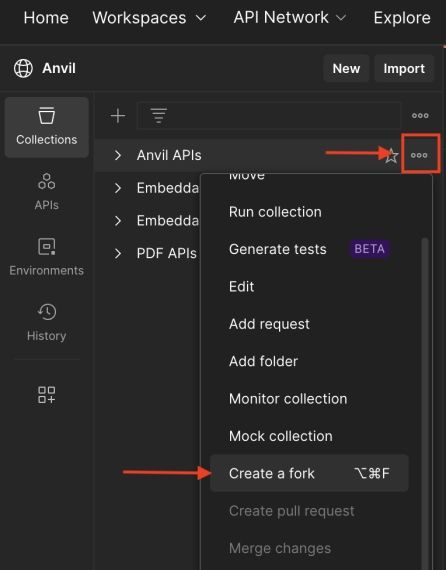 Creating a fork from the menu
This will open up a new tab in Postman where you will choose the fork’s label, the workspace, and whether you want to be notified when changes are made to the original collection.
Step 3. Get your API key
Once you have forked your desired collections, you will want to make use of your Anvil API key. Our GraphQL and REST APIs both require basic authentication with an API key.
Every Anvil organization comes with a development API key and a production API key. You can find your API keys on the Organization Settings -> API Keys page.
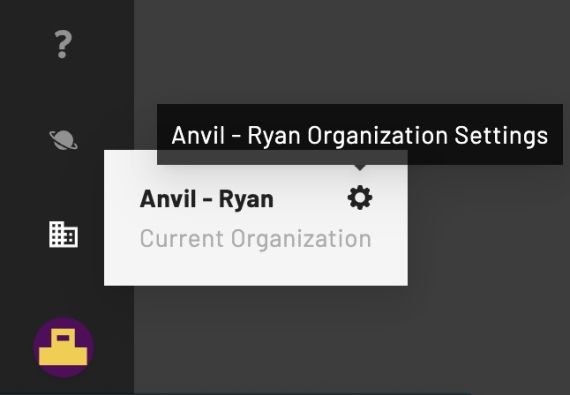 Getting to your organization settings
There, you will find an API Key card. Copy the key you wish to use to the clipboard.
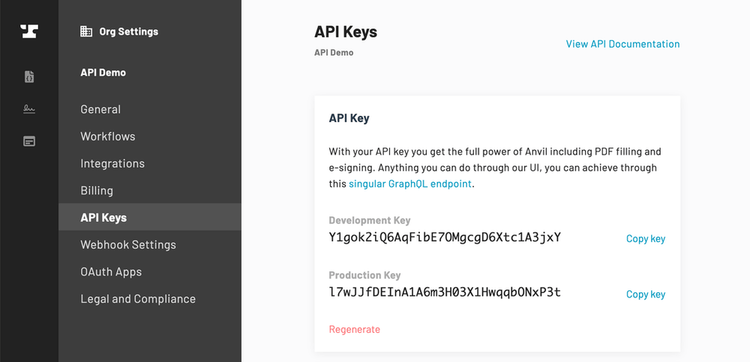 Locating your API key
The development key and production key work exactly the same, except in the following ways:
- Development key requests are free to use, while production keys will count toward your plan limits and then be charged on a metered rate once any usage included on your plan is exceeded. Make sure you have added a credit card to your account in order to go over the included usage without service interruptions.
- Development key requests are more aggressively rate-limited.
- PDFs filled or generated with the development key will have a watermark.
- See the development and test mode section for more info on working with Anvil in a development environment.
Note: Your API keys are meant to be used from a server or server-like environment (lambda function, etc.), not from a browser environment. Exposing your API keys in a browser will allow anyone to access information in your Anvil organization with the exposed API key, so make sure you keep your API keys safe.
Step 4. Add your API key to the collection variables
Once you have your API key, you will need to add it to your collection of variables in postman. Go to the Variables tab of your collection. There, you will find an API_KEY variable that has already been created for you. Input the key you copied from the previous step as the initial and current values of the API_KEY variable.
 Place your API key in the initial and current value section
Step 5. Authorization
Now that you have input values for your API_KEY, you will need to go to the Authorization tab, where you will set the authorization type to Basic Auth.
 Choose Basic Auth as your authorization method
Once the authorization type has been set, you will need to provide Postman with a username to authenticate your API calls. The username in this case is your API_KEY. You can pass this into Postman as a variable by passing in the key like so: {{API_KEY}}. No password is required when setting up your authorization in this way.
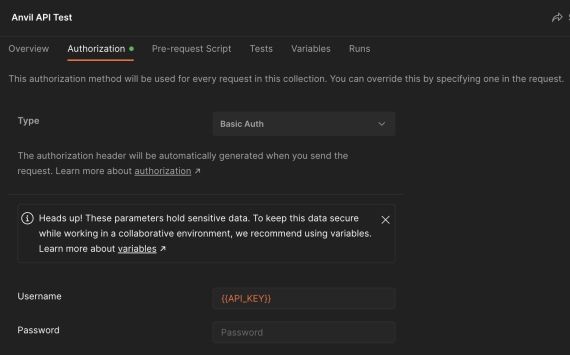 Authorizing Postman with your API key
Your collection is now authorized to use the Anvil API. You can now make a new Postman request.
Step 6. Create your query
Now that you are set up, take a look at our Postman documentation to help you create your own queries. Here is the Anvil API Reference Postman collection to help you create the queries you need. Once you have created your query, just hit send, and you can test the results of the query in its entirety, such as sending out a document to be signed via email.
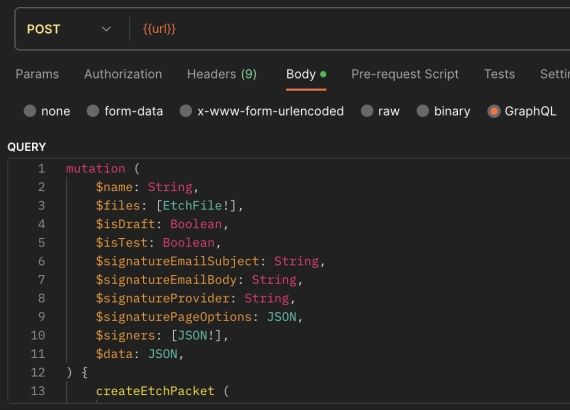 A GraphQL query to make use of the Anvil API in postman
Conclusion
Postman is an incredibly powerful API testing tool that makes the process of setting up and using Anvil's APIs easier than ever. By following the outlined steps, you learned how to quickly and securely get your Anvil collections up and running in Postman and begin exploring and testing the Anvil API. Whether you are just getting started or are familiar with Postman, the instructions provided in this blog post should help you understand how to use Postman with Anvil. Make sure to keep your collection up to date by pulling the latest changes from our public collections, as we are constantly updating our APIs to better serve you.
Have any other questions about using the Anvil API? We'd love to hear them! Email us at developers@useanvil.com!